Showing posts with label DIY. Show all posts

Friday, May 18, 2012

Paper Pockets...

It's very important that I make some of these paper pouches asap. I'm totally smitten! DIY found on the beautiful blog Crate Paper Blog via Melanie on Pinterest.

Friday, March 09, 2012

Superheros....


Okay I'm finally getting this post up. On my husbands side of the family we do a gift exchange every year. Well Christmas of December 2010 (yup, I said 2010) we had my sister in law, her husband and our two adorable nephews, Kaalam and Xander. I decided to get all creative and make them masks and capes. Fast forward to July of 2011 (yup, 2011) and I finally got the caps and masks finished and sent off to them. I'm happy to report that although the gift was over 6 months late they were thrilled with it none the less. 

I found templates for both the masks and the capes in this post on the blog Living Locurto. I bought stiff felt for the masks and cut out the boys initials and some lighting bolts and stars to attach (I used fabric glue). I then sewed some elastic to the backs using my sons head as a template. For the capes I bought some felt which I folded in half. I then cut out the capes on the fold and then sewed more initials, lightening bolts and stars onto them to personalize each one. I think they turned out pretty cute!

So fast forward to March of 2012 and I'm finally posting about my crafty adventure. Wow, I'm a slacker! Hope you enjoyed!

A huge thanks to my sister in law Amy for taking pictures of her boys for me to share. : )

Friday, March 02, 2012

A Whale of a Time....

 Oh my goodness check out these super cute Whales! I love their shape and fabrics that were used. Do you love them too? You're in luck because you can find a complete DIY posted by Jess on the super fun blog I Heart Nap Times. Found via Kasia on Pinterest.

Happy Weekend everyone!

Wednesday, February 01, 2012

The Photo Wall....

 The photo wall is done, the photo wall is done! This past Saturday marked our 1 year anniversary of being in our new house. I can hardly believe it's been one year. Not only does the time go by so fast but the house still looks bare in many rooms. We still need to buy furniture and hang a lot (I mean a lot!) of pictures. I was bound and determined that by the one year mark I was at least going to get something up on the walls in our dining room and I did it!

It took a long time to decide what to do on this wall. It's a bit strange as it has these two high, square windows in it. Finally after seeing many photo walls on Pinterest and loving them I decided to give one a try. Now I'm not going to lie, it was hard! Way harder than you'd think. In fact I'm not sure I'd attempt another one but maybe I just need to give it some time. Lol.
Step 1: trace the frames you're going to use onto craft paper and then tape the craft paper to your wall until you come up with a pattern you like (the paper in the above picture stayed there a good month). I found it helped to lay the frames out on the floor or table as I was taping the paper to walls to help me visually see what the frames would look like especially since I was using different colours, types and sizes.

Step 2: after many, many, many trails finally decide on the pattern you like best whether it's because you're too tired to go on or because you actually like it, at some point you just need to decide. Here's our winner (well almost). 

Step 3: Lay the frames out on the floor to make sure you like how they look and so you remember what goes where as you start to hang them (finding time to do this when your children won't step on or move said frames is another story). 

Step 4: figure out which pictures you want to use inside the frames. This may take awhile especially if you use the standard picture sizes in your printing program only to find out they've been cropped too small and the pictures don't fit in the frames/matts (argh!). Keep going until you're finally happy. As you'll see in the picture below I was hanging the frames as I was putting the pictures in them.

Step 5: Hang your frames! The wall slowly coming together. Now this took a bit of time as well because I decided to use a new product that would keep me from having to put too many holes in my wall (being that it's a brand new house it hurt a wee bit every time I hammered a nail into the beautiful, smooth wall). I used nails for about half the frames but the other half I used...

Have you heard of these? I love them! Love them! Basically it's like velcro for your walls except when you take the adhesive stripes off your walls they don't leave any marks what so ever! Love! 

 They're Command Hanging Strips. Basically you sandwich two strips together, remove the paper from one side and mount onto your frame. You then clean the wall with rubbing alcohol, remove the paper from the other side of your strips and position the frame on the wall where you want it. You then press firmly for 30 seconds and then carefully, from the bottom, remove the frame from the wall. One strip will remain on the wall and the other on your frame. You then have to wait an hour before putting your frame back on the wall (this is why it takes a bit longer than nails). After an hour snap your frame back onto the strip that's on the wall and that sucker ain't going anywhere!  

And now the finished product. It's not perfect which bothers me. The spacing was hard to get exactly right and a few frames are slightly croaked but honestly these are more things I see because I did it. Most people that look at the wall don't even notice. Thank goodness!


 I'm pretty happy with it and it's nice to have some family pictures up on the wall finally. Now only 20 or so more wall to go!


Friday, November 04, 2011

The Pumpkin and the Rocking Star....

I'm finally sharing some pictures of the Halloween fun we had this year. It was the first year that the kids were really into it and my daughter who is only a year and a half could have gone all night. She was a pumpkin and my son was a.......
"Rocking Star". Not sure why he calls it that but it's funny! People kept asking him if he was a Beatle and he's day "No, I'm Aden!". Kids are funny.
Before all the Trick or Treating fun my son and I made some Chocolate Bar Mummies an idea I found on the amazing site The Idea Room. You can see a tutorial here! The only difference from the tutorial is that we used Caramilk Bars. I think they turned out pretty cute!


Tuesday, September 27, 2011

100% DIY....


Happy Tuesday everyone! Today I wanted to share with you an awesome present that my friend Kasia gave me for my birthday. She made the whole gift herself.....these amazing coasters, the card and the box she packaged them in! So amazing! A 100% DIY gift and I love it all so much! I really appreciate all the time and thought she put into it! Thank you Kasia!


Kasia is a card maker and has her own blog, The Nature of Crafty Things, where she highlights her fantastic creations! I'm super envious of all the amazing techniques she knows most of which I've never even heard of. I'm hoping one day she'll give me some lessons! Here are just a sampling of the cards she makes. And I'd just like to mention that Kasia doesn't sell her cards. I think this is wrong, very wrong! heehee. Be sure to check out her blog often to see more lovely creations!


Thank you Kasia for the wonderful birthday gift and for inspiring me to get my scrapbook paper out again. It's been too long! : )


Wednesday, September 21, 2011

My Curtain DIY....

So my DIY list is pretty long right now which is unusual for me. I like DIY and being creative but usually I have a couple of things on the go and that's it. Well right now I've got about 8 projects and I'm not sure how or when they're all going to get done. The first one to tackle though were our curtains for our main floor and I'm happy to report they're also the first DIY to get done! Yippee! I've never made curtains before so there's a very good chance I did it all wrong but whatever, they're up and seem to work so I'm calling it a win! Here's how it went!

First I laid my fabric down (right side down) and then laid the lining on top of it. I left about 7 inches at the top without lining because this is where I was going to put my grommets and figured I didn't need the extra bulk of the lining to try and cut through. I did make sure that when sewing the top of the curtain I would catch the lining in the stitch. Had to do some hard math on that one but figured it out.

Then I did some pinning and some ironing....lots and lots of ironing and I've come to the conclusion that for a sewer an iron is your best friend.

Then I sewed the sides. There was a whole lot of math involved in this that I'm not going to describe because frankly I don't want to re-live it but lets just say it worked out in the end.

Then I sewed the top but before doing so I pinned my grommet tap in place so that I'd be securing it to the curtain at the same time I was sewing. Grommet tape is a cool thing. The holes are already set for you so all you have to do it sew it to the curtain, cut the holes out and snap your grommets on. Easy however this is why all the math was required. Because the holes are already set a certain distance apart it sort of determines how wide your curtain can be. This is a good and bad thing. Still even with all the math I'll use this tape again.


Ain't it perdy?


Then using the hole as your template I used a mat knife to cut a slit and then used scissors to make an x which made it easier to cut a circle. A really, rough sad looking circle I might add. It took some work getting the size just right so the grommets would snap on easily. Eventually I get into a groove.


Here's one hole with it's grommet and another hole without. I then hemmed the bottom, ran the iron over it all once more and......


The final product. We have a patio door and two windows on either side of our fireplace so I had to make 8 95" inch curtain panels. It took a long time! A long time but they're done and we like them so that's all that matters right?

And a shot of them open. The fabric is from Ikea I might add! Can't get away from that darn Ikea!

Again I'm not sure I did it all that right but they seem to work and I plan on making some curtains now for the bonus room and kids rooms. I just have to find some cool fabric first.

Now for the rest of my DIY list. : )


***This post is part of a Collecting Color Link Up hosted by Cyn of RiverDog Prints. Anyone can participate! Collecting Color is a bi-monthly post to share what you’re working on, photographing, DIY-ing, reading or making. Anything goes, as long as it’s colorful, creative and you share a link below.

Wednesday, June 15, 2011

Felt Birthday Hats....


I think I'm going to have to add this to the need to try soon list I have going. So adorable! I found this wonderful Felt Birthday Hats DIY on Princess Lasertron via the blog Hip Hip Hooray. You can find the hole tutorial and many more fun pictures here.


Friday, May 27, 2011

The Power of Re-Packaging

I can't tell you how or when I came across Melanie's fantastic blog You Are My Fave but what I do know is the first time I saw it I was hooked. I don't know if it's the sweet bunting, the wonderful party ideas or the posts which are always written with a touch of humor (it's all three!) but I am a loyal follower! You can imagine how thrilled to pieces I am that Melanie agreed to do a guest post for my blog! Seriously jumping for joy! Thank you Melanie!

IMG_0493

IMG_0507

IMG_0502

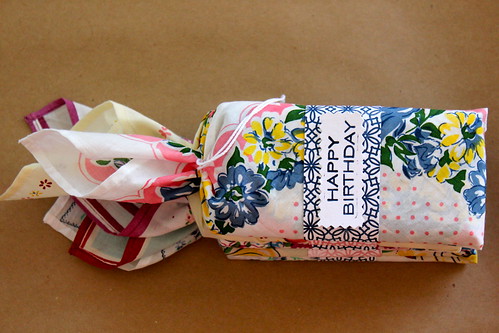
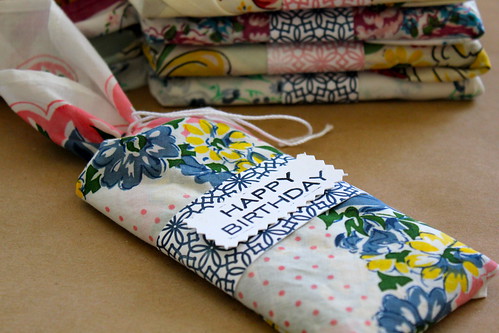
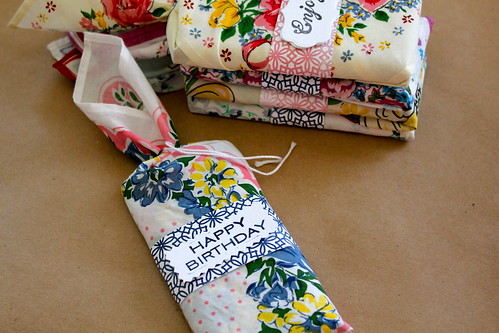
I'm a believer in the power of re-packaging. While a good quality chocolate bar is always appreciated, it makes an even bigger impact with a quick wrap in a vintage hanky and banded with printed paper and a simple message. The good thing is, you can find great hankies at the thrift store for less than $1/piece and recycle a letterpress card to make it all your own. A simple, pretty gift for under $4 - depending on how good of chocolate bar you go with. Tip: don't go with Hershey.

- Melanie

Tuesday, May 17, 2011

DIY- Pretty Painted Glass Jars

Hello there! It's Krystin here, the lady behind My Sweet Baboo Etsy shop and Sappy Apple blog. Since joining the Etsy Alberta Street Team I've been keeping an eye on this lovely blog of Lindy's and have had to pleasure of getting to know her a little more. I was super excited when she asked me if I would contribute a little DIY guest post while she and her sweet family were enjoying their trip to Disney World. So, here it is! Please keep in mind that I'm the mama to a very busy and curious almost two year old... Excuse the imperfections.
Ever since I saw this picture in Martha Stewart magazine, I've been wanting to make something similar. I love her dishwasher safe enamel bottle How-To, but I had a bunch of pretty paint left over from other crafts and I have quite a few things like pens, knitting needles and dried flowers that would be fine to fill the jars with. So, although mine are not dishwasher safe, they are still completely usable. I have a pretty large collection of mason jars that we used for our wedding just sitting in the garage, so I decided to give a few of them a lick of paint on the inside. I love the way they turned out. If you use a similar palette for the different containers, and try to use glassware with different textures on the outside, the result is a set which is matching in tone but varied in texture. It's really quite wonderful. Sorry I don't have any examples to share with you all.
Try to use paint that isn’t too thick – although it needs to be thick enough to ‘stick’ to the glass. Left over wall paint would work fine but, I just used some left over acrylic paint. You’ll need to get creative when getting the paint to cover awkwardly shaped bottles. I had to swirl, shake and swivel the bottles in one hand until, eventually, they were coated thoroughly. A paintbrush can help, but the only tool you really need is patience!

You will need:
• Old glassware- cleaned and dried thoroughly
• Lids

• Paint
• Old newspaper or something to keep the mess under control

• Paintbrushes (optional)

Step One Pour in a big dollop of paint, screw on the lid and start to swirl. I had to swivel and shake the jar for a while before it was completely coated. If the mouth of the jar is big enough, you can use a paintbrush to get the job done quickly.
I tried adding three different paint colours to one of the jars and was delighted by the results. I think I still like solid colour look more though.
Step Two When you’ve coated the inside of the container, leave it upside down to let it drip onto the lid as much as possible. I waiting long enough to make some lunch and do a load of laundry... about half an hour.
Step three Unscrew the lid carefully and let the rest of the paint drip out into an extra jar or right back into the paint container to use again.
Clean the rim of the glassware while the paint is still damp and leave to dry – this can take up to two days depending on the paint you use.
Now fill with flowers, pencils, buttons, knitting needles or whatever takes your fancy…